

 English
 中文简体
中文简体Content
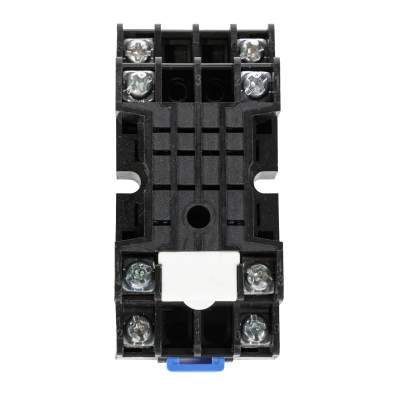
Relay socket installation typically involves two main methods: first, quick snap-on installation using a 35mm standard DIN rail (most common), and second, screw fixing through the mounting holes provided on the base. For removal, with rail-mounted relay sockets, simply insert a flat-head screwdriver into the mounting hook (latch) at the bottom and pull downwards to easily remove the base from the rail; for screw-fixed types, simply loosen the fixing screws to detach the socket. As a core connecting component in electrical control cabinets, mastering the correct installation and removal techniques can significantly improve panel assembly efficiency and effectively prevent plastic parts from breaking due to forceful operation.
I. Standard Installation Steps for Relay Sockets
In the assembly process of industrial automation control cabinets, the stability of the relay socket (also often called the relay base) directly affects the reliability of signal transmission. The following are detailed instructions for the two main installation methods: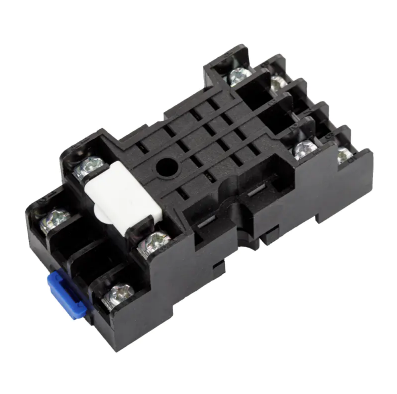
1. Rail-Mounted Installation (Recommended)
This is currently the most common installation method, suitable for most series products such as PYF and PTF.
- Align the slot: Hook the upper slot on the back of the relay socket onto the top edge of the 35mm standard DIN rail.
- Press to fix: Press down on the lower end of the socket with your finger, or gently push up the bottom latch with a screwdriver. A clear "click" sound indicates that the relay base is securely locked onto the rail.
- Check for stability: Gently shake the socket left and right to ensure it is tightly attached to the rail without loosening.
2. Screw-Fixed Installation
For high-vibration environments or retrofitting old equipment without rails.
- Positioning and drilling: Mark the mounting holes on the back panel according to the two diagonal mounting holes on the relay socket housing.
- Tighten: Use M3 or M4 screws (depending on the specific model specifications) to directly fasten through the mounting holes. Be careful not to overtighten to avoid cracking the insulating housing.
II. Safe Disassembly Techniques for Relay Sockets
Many electricians often cause deformation of the DIN rail or breakage of the socket hooks due to improper handling during maintenance or component replacement. Correct disassembly of relay sockets requires the use of simple tools:
- Removing the relay body: Before disassembling the base, be sure to first remove the intermediate relay or time relay plugged into it, and disconnect the relevant wiring to ensure the power is off.
- Releasing the latch: Locate the elastic mounting hook at the bottom of the relay socket (usually a pull ring with a hole). Insert a flat-head screwdriver into the hole of the pull ring.
- Prying downwards: Gently pry or pull the hook downwards to release the bottom latch from the edge of the DIN rail.
- Lifting and separating: While keeping the hook pulled open, pull the bottom of the socket outwards, then lift it upwards to completely remove it.
III. Manufacturer's Technical Tips: Wiring and Maintenance After Installation
As a professional relay socket manufacturer, we have found in our after-sales service that 70% of failures are not due to product quality issues, but rather due to improper installation. The following points require special attention:
- Foolproof design: High-quality relay sockets should automatically adapt to the tolerances of the DIN rail after installation. If you find the installation particularly difficult, please check if the DIN rail is bent or deformed.
- Preventing stripped threads: When wiring relay sockets, it is recommended to use a torque screwdriver. Too loose connections will lead to increased contact resistance and overheating, while overtightening may cause the internal copper threads to strip.
- Material selection: It is recommended to choose socket products with V0-grade flame-retardant material casings and high-precision phosphor bronze spring contacts. Low-quality bases are prone to aging and becoming brittle under long-term current loads, and are easily broken during disassembly.
Following standardized installation and disassembly procedures can significantly extend the service life of relay sockets and the entire electrical system. If you encounter special specifications or requirements during selection or use, please feel free to contact us for technical support.


")
-1")
-2")
-3")


